Friday, 9 June 2023

How to Mass Download Files (or Attachments) from a record detail page in salesforce?

Julie (Account Manager) needs to download all the Files/Attachments for an individual salesforce record, but in the standard salesforce, we don't have any standard action to do it.

Manually performing these type of work requests would take much more effort and time, but with our Salesforce Appexchange File ZIPO App, user can perform these action in a few clicks.

User can perform this task in few simple steps:
1. Install the FileZIPO application in Salesforce
2. Open the File ZIPO download component on record detail page. 
3. Click the button and Download files/attachments
4. Done.

Few Simple Steps to Download multiple files/attachments of an individual record

Step 1:- Need to add a FileZIPO component/action button on record detail page to download multiple files. (SKIP this step if you have already added the component or button)

How to add a Quick Action (Button) on Object record page. Please follow the below steps to add a quick action button on page layout.

Step 1: Open object manager in setup. (Click here to open) ?

Step 2: Search your object name & open it.?

Step 3: Click "Buttons, Links and Actions" on left side panel.?

Step 4: Click "New Action" (Skip this step if Download/sync/Backup file button is already added on this object.)

Step 5: Enter below details, & click save.?

Action Type : "Lightning Component"

Lightning Component : "FileZipperManageFilesAttachments"

Height : "450px"

Label : "Download / ZIP"

Step 6: Finaly add this action button on your layout & you are done.


Step 2:- Once the button is added in step 1 or open the record detail page where button is already added


Step 3:- It will open the below screen


    Above image has some features (each number has its description as below):
  1. Select the type
  2. User can filter by List View 
  3. User can filter the rows by the file/attachment name
  4. User can use advance filter to filter the rows by User, Date, Object, keywords
  5. Select single or multiple file/Attachments.
  6. User can download individual file using download icon in the last column of each row. 

Step 4:- Select the rows & click this button "Click Here to Continue". Once clicked, it will open a popup


    Above image has some features (each number has its description as below):
         1. Choose the type of option as "Download (as ZIP)"
2. Choose Folder Structure as "Single folder for all selected files"
3. Click on "Download Files" Button to initiate the process to ZIP files

Step 5:- Once "Download Files" button is clicked, it will instantly download the ZIP file.


Wednesday, 8 February 2023

How to merge salesforce files into Single PDF using Salesforce Flow in few clicks?


Requirement:

Alex need to print 1000 pdf files stored in salesforce across multiple objects or records. As per salesforce standard, there is no out-of-box functionality to merge without downloading the files. User needs to download the files and use any external tool to merge them or print them one by one manually. 

These type of work requests would take much more effort and time for an end user. In order to overcome this situation, here we are introducing the "AYAN PDF" - an api kit for all your needs.
Using AYAN PDF merge apis, user can easily merge any number of files in salesforce using multiple ways.

User can merge Files using AYAN PDF Apis in multiple ways:
  • Flow
  • Apex Classes (using synchronous or asynchronous methods like batch, future)
  • Lighting Component
  • Visualforce Pages / JavaScript

Benefits of using AYAN PDF Apis to merge files:
  1. User can merge any number of files in single click
  2. User can merge any type of files (like Salesforce Files, Attachment, Documents)
  3. User can call these apis in multiple ways as highlighted in above table
  4. Simple and easy to integrate

How can we merge files using AYAN PDF Apis?

User can merge multiple files into single pdf in two ways:
  • Calling AYAN PDF Apis in Apex/Aura - Being a Salesforce Developer, user can use the below two apis to merge files in few clicks. 
  • Calling Predefined Flow - Our Appexchange solution "File ZIPO", uses the AYAN PDF Apis to merge multiple files into Single File. Once installed, user can call a predefined "Merge Flow" which is a part of this managed package, in which user needs to pass few parameters and files will be merged and sent to the email address defined by the user. 
Let's learn how to do it step by step:


Few Simple Steps to Merge Salesforce Files using pre-defined FLOW in File ZIPO:

Step 1. Install the latest version of Salesforce Appexchange application called "File ZIPO" using below link:   https://www.filezipo.io/release-notes/


    User can click on the type of the org in which they need to process their files.


Step 2. Once installed, user will find two flows in their list of flows (displayed in the below table).


  • MergeFiles Using AYANPDF API - this is the main flow which needs to be called to initiate the process for merging the files. The sample flow also calls this main flow.
  • Merge Files Reference Flow using APIs - this is the reference / testing flow which guides user with the ways to merge files in multiple ways. In this sample flow, user can call the below actions and try to merge files using apis.
        Actions include:
    • Allow user to find & select attachments and send for merge
    • Allow user to find & select files and send for merge
    • Allow user to find & select documents and send for merge
    • Allow user to find attachments and send for merge (without selection)
    • Allow user to find files and send for merge (without selection)
    • Allow user to find documents and send for merge (without selection)
    • Allow user to merge AWS S3 public files into single pdf file

Step 3. User can create its own flow here or can refer next few steps in which we will use the "sample flow" to explain how user can call the "main flow" and pass its parameters.

Just click on sample flow name and click this "run" button:


Step 4: Once the run button is clicked, it will display the below screen to the end user:


    The fields highlighted in above screenshot are defined as below:

    1. Receipient Name - defines the name of the person who has submitted the request
    2. Merged File Name - defines the name of the merged file name which should be sent to the user
    3. Receipient Email - defines the email of the recipient user
    4. Receipient cc address - this is optional field
    5. Choose Action type - defines the type of action with which user needs to test the apis.

NOTE: This is reference or sample flow only. User can clone or edit this flow and can make the changes to it to test different scenarios.


Step 5: Once the "Next" button is clicked, depending upon the action selected, it will display the next screen. Let's take an example that user has selected the action as "Allow user to select files and merge"

On the next screen, it will display list of files for the user to select.

Once the files are selected and next button is clicked, the sample flow will display the "Selected Files" in the next screen for confirmation. (User can skip this screen or change them accordingly)


Step 6: Once the "Next" button is clicked, it will initiate the process of merging the files. The next screen will show the status bar for the number of items are processed and how many are remaining.


Once the process is completed, its going to send an email to the user on the defined email address as shown in below image:


NOTE: 

The Steps 4, 5, 6 has gathered the different type of information as highlighted in below table from the UI Screens. These parameters needs to be passed to main flow "MergeFiles Using AYANPDF API" to initiate the merge process.

    1. Recipient Name - Defines the name of the person who has submitted the request
    2. Merged File Name - Defines the name of the merged file name which should be sent to the user
    3. Recipient Email - Defines the email of the recipient user
    4. Receipient cc address - Defines if need to add anyone in CC (this is optional field)
    5. selectedRecordType - Defines the type of record we are trying to merge. It can contains either one of these three values: Attachment, File or Document
    6. selectedRecordIds - Defines the list of record Ids of any of three objects (Attachment, Content Version, Document). Please don't combine the Ids of multiple entity in single list. 
    7. selectedAttachment_List - Defines the list of Attachments records which needs to be merged
   8.selectedDocument_List - Defines the list of Document records which needs to be merged 
    9. selectedFile_ContentVersion_List - Defines the list of Content Version records which needs to be merged


Sample Flow
Sample flow screenshot calling the sub flow


You can reach us anytime for any query or challenges or questions on the below details:

Name: Mohit Bansal
Email: support@ayansoftwares.com / mohit.bansal@ayansoftwares.com

Thursday, 22 September 2022

How to “Clone Profiles” in bulk in Salesforce in few clicks?

 ABC Company is using Salesforce to manage its Sales, Service Cloud activities. They have lot of Profiles which are being used to manage the permissions for the different type of users.


ABC Company is expanding its business and want to setup a new Salesforce org (Org 2) which is replica of existing salesforce org (Org 1). In order to replicate, they need to perform multiple activities like:
  • Clone Custom Objects with all its metadata
Refer this article to perform this action in few clicks:
  • Clone Reports (with Report Types & Report Folders)
         Refer this article to perform this action in few clicks:
How can I clone multiple profiles from any source org to current Org?

As both the orgs (Org 1 & Org 2) are not inter-linked to each other, Alex (an administrator of ABC Company), will have to manually copy each and every entities of the profiles and complete his action. 

For eg: In case, if a developer has to clone a profiles with many objects, record types, layouts permissions etc, then admin would have to open each and every profile and clone them to new org.  

These type of work requests would take much more effort and time, but with our Salesforce Appexchange Bulk Object Field Creator (BOFC) App user can clone multiple profiles within "Current  Salesforce org" or from any "External Salesforce org" in few clicks.

Benefits of using BOFC Application to Clone Profiles:
  1. User can clone multiple Profiles in single GO using BOFC
  2. This feature has an option for a user to override any existing Profiles or create the profiles which are not available
  3. User can clone profiles from Same or External (non-linked) salesforce org
  4. Simple Point & Click UI only.

Few Simple Steps to Clone Profiles in salesforce

1. Open the BOFC Home > Click "Clone Profiles"


2. It will open below screen for BOFC Clone Profile


User can clone Profiles from different type of source orgs:
  • Can clone from "Current Salesforce Org" in which BOFC is installed
  • Can clone from "External Salesforce org" (Salesforce org which are linked / non-linked to current org in which BOFC is installed)
3. Select the "Source Org" from where you want to clone the profiles


4. Click "Show Profiles(s)" button and it will start the process to retrieve the "All Profiles" in the selected Org.

5. Select (single or multiple) profiles which needs to be cloned. Once ready, click on "Clone here to Initiate Clone" button to initiate the process.


Once this blue button is clicked, it will open a popup with some instruction in it. Just follow the instructions and you are done.


    Override / No-Override - In case the Profile with the same name already exists:  
  • Clone Profile (which are not available) + Override (any existing) Profile = In this case, the clone process will override the existing Profile which the same name.

  • Only Clone Profile which are not available in this org = In this case, the clone process will only create the Profiles which doesn't exists in the current org.

6. Once the "Click here to Clone in Current Org" buttons is clicked, it will update the status against each row for all the profiles

  
Green means - Profile Cloned Successfully
Red means - Profile get error out because of the some reason.


For more details, refer official webpage of this application

How to “Clone Custom Metadata Types (along with its records)” in Bulk in Salesforce in few clicks?

ABC Company is using Salesforce to manage its Sales, Service Cloud activities. They have lot of Custom Metadata Types which are being used to manage specific information for the business processes.


ABC Company is expanding its business and want to setup a new Salesforce org (Org 2) which is replica of existing salesforce org (Org 1). In order to replicate, they need to perform multiple activities like:
  • Clone Custom Objects/Fields:  Refer this article to perform this action in few clicks
  • Clone Flows:  Refer this article to perform this action in few clicks
  • Clone Custom Metadata Types (along with its records)
How can user clone multiple "Custom Metadata Types (along with its records)" from any source org to current Org?

As both the orgs (Org 1 & Org 2) are not inter-linked to each other, Alex (an administrator of ABC Company), will have to manually copy each and every entities and complete his action. 

For eg: In case, if a developer has to clone Custom Metadata Types of different types, then admin would have to open each and every Custom Metadata Types and clone them to new org.  

These type of work requests would take much more effort and time, but with our Salesforce Appexchange Bulk Object Field Creator (BOFC) App, user can clone multiple Custom Metadata Types within "Current Salesforce org" or from any "External Salesforce org" in few clicks.

Benefits of using BOFC Application to Clone Custom Metadata Types:
  1. User can clone any type of Custom Metadata Types using BOFC
  2. User can also Clone records related to multiple Custom Metadata Types
  3. This feature has option for a user to choose whether they need to override any existing or create new Custom Metadata Types
  4. User can clone Custom Metadata Types from Same or External (non-linked) salesforce org
  5. Simple Point & Click UI only.

Few Simple Steps to Clone multiple Custom Metadata Types in salesforce

1. Open the BOFC Home > Click "Clone Custom Metadata Types"


2. It will open below screen for BOFC Clone Custom Metadata Types. Select the mode of Operation as "Clone"


3. Select the type of entities to Clone & the "Source Org" from where you want to clone the Custom Metadata Types

NOTE: 
User can click on "Records" checkbox to clone the records related to the Custom Metadata Types


User can clone the Custom Metadata Types from different type of source orgs:
  • Can clone from "Current Salesforce Org" in which BOFC is installed
  • Can clone from "External Salesforce org" (Salesforce org which are linked / non-linked to current org in which BOFC is installed)

4. Select the single or multiple Custom Metadata Types which needs to be cloned. Once ready, click on "Click here to Continue" button to initiate the process.


Once this blue button is clicked, it will open a popup with some instruction in it. Just follow the instructions and you are done.


  • Append Keyword - User can add any keyword in the Custom Metadata Types Name. If user leaves the field blank, then nothing will be added.
  • Type of Action -
    • Clone (which are not available) + Override (any existing)  = In this case, the clone process will create the new Custom Metadata Types & override any existing with same name
    • Only Clone which are not available in this org = In this case, the clone process will create the Custom Metadata Types which are not available in the current org


6. Once the "Click here to Clone" buttons is clicked, it will update the status against each row for all the Custom Metadata Types.


Green means - Custom Metadata Types Cloned Successfully
Red means - Flow got error out because of some reason.


For more details, refer official webpage of this application

How to “Clone Custom Settings” in Bulk in Salesforce in few clicks?

ABC Company is using Salesforce to manage its Sales, Service Cloud activities. They have lot of Custom Settings which are being used to manage specific information for the business processes.


ABC Company is expanding its business and want to setup a new Salesforce org (Org 2) which is replica of existing salesforce org (Org 1). In order to replicate, they need to perform multiple activities like:
  • Clone Custom Objects & all of its custom fields, validation rules, Page-layouts, Field Sets:  Refer this article to perform this action in few clicks
  • Clone Flows:  Refer this article to perform this action in few clicks
  • Clone Custom Settings
How can user clone multiple custom settings from any source org to current Org?

As both the orgs (Org 1 & Org 2) are not inter-linked to each other, Alex (an administrator of ABC Company), will have to manually copy each and every entities and complete his action. 

For eg: In case, if a developer has to clone custom settings of different types, then admin would have to open each and every custom setting and clone them to new org.  

These type of work requests would take much more effort and time, but with our Salesforce Appexchange Bulk Object Field Creator (BOFC) App, user can clone multiple custom settings within "Current Salesforce org" or from any "External Salesforce org" in few clicks.

Benefits of using BOFC Application to Clone Custom Settings:
  1. User can clone any type of Custom Settings using BOFC
  2. This feature has option for a user to choose whether they need to override any existing or append any keyword to existing custom setting name
  3. User can clone custom settings from Same or External (non-linked) salesforce org
  4. Simple Point & Click UI only.

Few Simple Steps to Clone multiple Custom Settings in salesforce

1. Open the BOFC Home > Click "Clone Custom Settings"


2. It will open below screen for BOFC Clone Custom Settings. Select the mode of Operation as "Clone"


3. Select the "Source Org" from where you want to clone the custom settings

User can clone the custom settings from different type of source orgs:
  • Can clone from "Current Salesforce Org" in which BOFC is installed
  • Can clone from "External Salesforce org" (Salesforce org which are linked / non-linked to current org in which BOFC is installed)

4. Select the single or multiple custom settings which needs to be cloned. Once ready, click on "Click here to Continue" button to initiate the process.


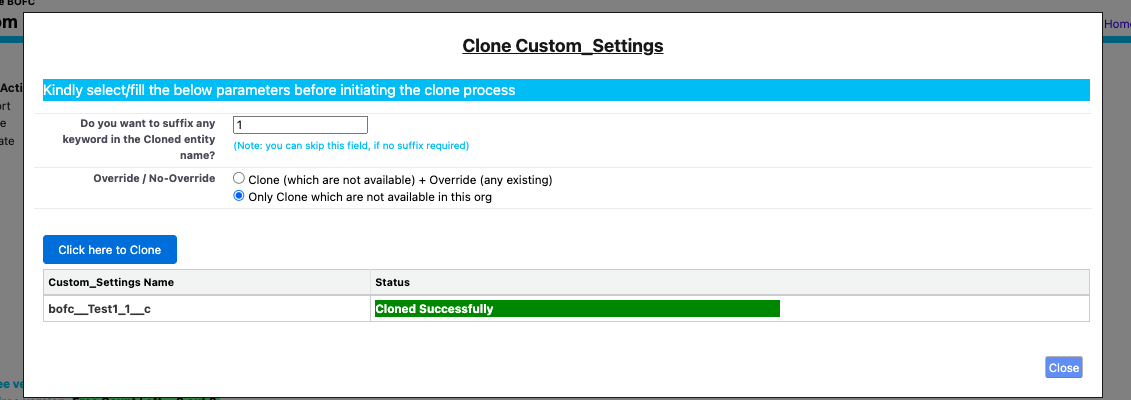
Once this blue button is clicked, it will open a popup with some instruction in it. Just follow the instructions and you are done.


  • Append Keyword - User can add any keyword in the Custom Setting Name. If user leaves the field blank, then nothing will be added.
  • Type of Action -
    • Clone (which are not available) + Override (any existing)  = In this case, the clone process will create the new custom settings & override any existing with same name
    • Only Clone which are not available in this org = In this case, the clone process will create the custom settings which are not available in the current org


6. Once the "Click here to Clone" buttons is clicked, it will update the status against each row for all the custom settings.


Green means - Custom Settings Cloned Successfully
Red means - Flow got error out because of some reason.


For more details, refer official webpage of this application