Sunday, 1 December 2024

How to use KAiZEN Chrome extension to generate eSign request in few clicks?

KAiZEN eSign is a powerful and intuitive chrome extension designed to revolutionise the way you sign documents electronically. With just a few clicks, you can effortlessly add your digital signature to any PDF or document, saving you time and effort. With KAiZEN eSign, you can sign documents from anywhere, anytime, on any device.


KAiZEN offers multiple features to make eSigning easy and efficient, including:

  • Ability to send eSign request to multiple signers in single request.

  • Ability to sign documents in multiple ways like manual draw, upload sign, auto-generate with name initials.

  • The final eSign document has secure and verified signature with certificate attached to it.

  • A user-friendly interface that is easy to use.

  • The ability to add text, dates, and other annotations to documents.

  • The ability to securely store your signed documents.


Step-by-Step guide on how to use KAiZEN eSign Chrome Extension:


Step 1.  Install/Upgrade the KAiZEN eSign Chrome extension (Skip this step and jump to step 2, if the extension is already added to the browser)


  •  Search for KAiZEN eSign: Search for "KAiZEN eSign" in the search bar.


  •  Install the Extension: Click on the "Add to Chrome" button to add the extension to the browser


  • Once added to the browser, click on pin icon to add the extension on the extension bar.


Here is how the extension looks when clicked from extension bar:


Step 2.  After adding the extension to the browser, a quick step is to configure the KAiZEN account details (Skip this step and jump to step 3, if the KAiZEN account is already configured inside the extension)

  • Add Account Details : Go to settings tab and add the KAiZEN account details received from KAiZEN team (i.e; Name with Access Token)
    (Note: If you don't have an access token, please reach out to support at support@ayansoftwares.com for further assistance)


  • Remove Account Details: Simply click on the delete icon, next to Access Token Field


Step 3. How to Generate an eSign Request


  •  Open the extension window: Click on the KAiZEN eSign icon in the chrome extension toolbar.


  •  Select Your Account: Click on the "Select Your Account" dropdown under the "Generate Request" section and select your desired kaizen account from the list.


  •  Fill Requestor Details: Enter the name, email and mobile number in the provided fields of the person who is raising the request for eSign.


  •  Choose File: User can choose any of the below options to choose the file

  • Option 1: Drag and Drop: Drag and drop the PDF file you want to sign

  • Option 2: Choose File: Click the "Choose File" button to select the PDF file from your device.


Step 4. Define Signer(s) / Reviewer(s) details


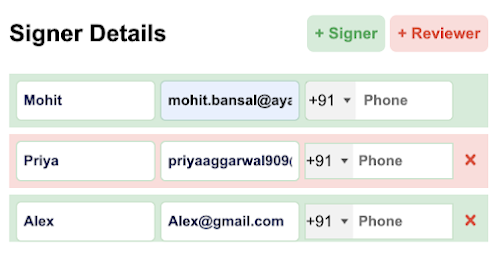
User can enter details for multiple signers /reviewers in this section. For each user, enter their name, email and mobile number.


Signer: a person who will actually sign the document electronically.

Reviewer: a person who will just review the document electronically and will not sign.


Click the "+” button above the table to add one or more signers /reviewers.


NOTE: The sign request will be send in the order of the information added in the above table.

For eg: If there are users (Mohit, Priya and Alex) as defined in the above example, then sign request will go to "Mohit" as a first signer. Once it is signed by Mohit, it will go to "Priya" as a reviewer. Once "Priya" reviews the request, it will go to "Alex" as a final third signer.


Step 5. Do you want to self sign the document?

Using this option, user can choose whether they want to self sign the document and doesn't need to send it to anyone. Once the "Yes" is selected, it will display the button called "Sign Now"


Step 6: Finally, we are ready to make some actions:

KAiZEN extension has four buttons. Let’s understand the different actions you can do in this extension

a. Send for eSignature:

If user choose not to self sign the document and need to send it to someone, in that case it will choose "No" and it will display the button called "Send for eSignature"

Review all the details (including requestor and signer information) and click the "Send for eSignature" button to send the file to the specified users in the same order as defined in the signer section.


b. Generate URL:

Use this button to quickly generate the eSigning request URL and share it via Email or directly send it by any other platform for anyone to sign it.


c. Add Tags:

Use this button to quickly add the different type of tags like "text", "date",etc on the PDF document.

On the pdf document, wherever user will add the tags, the signers will have to mandatory fills the information at those tag places.


d. Reset:

User can use the "Reset" button to clear all the filled information in the above form


By following these steps, you can efficiently use the KAiZEN eSign Chrome Plugin to streamline your electronic signature workflows.


Sunday, 28 April 2024

How to recall or cancel any sign request (if request is not completely signed by all signers)?

Using AYAN KAiZEN, businesses can digitally or electronically sign a contract or deal or any confidential document in a secured way. There is no need for the sales team to send any physical documents for signing, as it will take time and can delay the process. 

Signers can create/draw/upload a secure and verifiable signature, which can be used on any device to digitally sign or embed sign to a specific location on the documents.

Few Questions:

  • Is it possible to cancel a sign request once it is placed by requestor? 
  • Can we cancel the sign request if its status is not yet marked as completely signed?
  • Can we cancel a request if the request is signed by one of signers and pending for other signers to sign?
One word Answer: Yes, we can recall or cancel the sign request in all the above cases.

Few simple steps to recall any sign request:

Step 1: Assuming the sign request is already generated. Whenever a new signRequest is initiated (refer this blog), it generates a signRequestID in the response, which is required parameter to recall a sign request. Kindly store the signRequest ID in the response.

Sample HTTP Response for new sign request:
{
"FailRules": [],
"Data": {
"SignRequestId": "01HV6MEARQD3X8ZXXX5FR3YDB8",
"RequestNo": "KAiZEN-118"
}

} 

Step 2: In order to recall any signRequest, user need to make a secure HTTP Callout as per the below details:

HTTP Request Parameters
Paramters NameValue
Content-Typeapplication/json
MethodPOST
Endpointhttps://fa-kaizen-prod.azurewebsites.net/api/RecallSignRequest?code=RTa1A0GW5Yl92OF54-73lRqglLFCt_0pVcg86hWf1EjtAzFuNROcdA==
BodyJSON Body with parameters

Request Body Parameters
Paramters NameDescriptionRequired
signRequestIdUnique ID of the sign requestYes
appTokenUnique Code to initiate the requestYes
recallReasonReason for recall the requestNo
recalledByName of the person who initiated the recallYes


Sample HTTP Request:
HttpRequest request = new HttpRequest(); request.setEndpoint( << Initiate Sign Endpoint URL >> ); request.setMethod('POST'); request.setHeader('Content-Type', 'application/json'); request.setBody( << JSON Body as shown below >> ); request.setTimeout(120000);

Sample JSON Body:
{
"signRequestId": "<< unique id of sign request>>",
"appToken": "01HQMDX-YCP019-Z2P3SX-QPSB53-8B4A3F-BC40B8-B10908-FB2FF4-A",
"recallReason": "Request raised mistakenly",
"recalledBy": "Mohit Bansal"
}


Sample HTTP Response:
{
"FailRules": [],
"Data": true
}

Once the request is submitted, it will generate the different responses depending upon different scenarios:

  • Scenario 1: If the sign request is open or not completely signed, then request will successfully get cancelled with status as true.
  • Scenario 2: If the sign request is already signed, then it will display a error message in the response with the message "This request is already cancelled"

  • Scenario 3: If the sign request has invalid token, then it will display a error message in the response with the message "Invalid App Token"
  • Scenario 4: If the sign request has invalid id, then it will display a error message in the response with the message "No sign request found"

How to generate "APP Token" to make any api request with KAiZEN?

Using AYAN KAiZEN, businesses can digitally or electronically sign a contract or deal or any confidential document in a secured way. There is no need for the sales team to send any physical documents for signing, as it will take time and can delay the process. 

Signers can create/draw/upload a secure and verifiable signature, which can be used on any device to digitally sign or embed sign to a specific location on the documents.

In order to make any api request, user needs an application token (abbreviated as appToken), which is mandatory to pass in every callout request.

What is app token?

Application token (abbreviated as appToken) is a secure code which is unique across each customer. The app token cannot be repeated for any customer. One customer can generate multiple tokens depending upon the application or project the customer is working. For eg:

Token Table
Application NameValidityToken
Project 1365 daysProject1Token
Project 260 daysProject2Token                                                


Few simple steps to generate an app token:

Step 1: If you are a new user, then signup for free account or, if an existing user, login in to the account with the credentials. Kaizen Portal Login url:  https://portal.ayankaizen.com


Step 2: OTP verification. User will receive an OTP code on registered email address if the MFA is enabled.


Following is the email received at the registered email address 

Step 3: Once logged in, click on Settings tab on the left side menu items


Step 4: Click on "Create App Token"


Step 5: It will open the below popup. Enter the name of the project or application for which this token will be used and once saved it will auto generate a token which can be used to call any Kaizen API's. 

User can generate multiple tokens for different projects in which the token needs to be used. The default validity for each token is one year.

Step 6: Once the name is added. for eg: Project 2. It will generate the token and will close the popup.

       Copy the token and use it in integrating the KAiZEN Api's.


Saturday, 20 April 2024

How to clone multiple List Views from same org (or any external source org) in few clicks?

Let's ask few questions to ourself about Salesforce Standard List Views:

1. Can we add multiple List Views in single click?

2. Can we update multiple list views at the same time?

3. Can we delete multiple list views in single click?

4. Can we Clone multiple list views in single click?

Answer is BIG NO. Salesforce standard list view doesn't provide these bulk features. In case, if an admin has to perform these actions, then admin would have to open each and every List View one by one and perform the required action.

These type of work requests would take much more effort and time, but with our Salesforce Appexchange application Bulk Object Field Creator (BOFC), admin can clone multiple List Views of same org (or any external salesforce org) in few clicks.


Few simple steps to clone multiple List Views in few clicks


1. Open the BOFC Home > Click "Clone List Views"


2. It will open below screen to Clone list views. Select the type of operation as "Clone multiple list views" option in radio button.


3. Select the source org from which list views needs to be cloned. In case source org is not available in drop down, kindly click on "Manage Org Details" to add new source org. 

Once source org is selected, it will display the list of source objects. Select single or multiple source objects. Once ready, click "Fetch List View(s)" button to initiate the process to fetch all the existing list views of selected objects.


4. Select the single or multiple ListViews. Once ready, click on "Clone List Views" button to initiate the process.


5. Once the "Clone ListView(s)" buttons is clicked, it will open a popup with some fields to fill. Once the information is filled, click on "Click here to clone in current org" button.


and here is the result:


For more details, refer official webpage of this application